Step-by-Step Assembly Guide for WaveLine Tension Fabric Banners
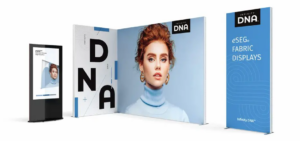
As a trade show professional, you need a display that is fast to set up, reliable, and visually striking. WaveLine Tension Fabric Banners deliver on all three counts. Designed for quick, tool-free assembly, this banner system converts from transport case to finished display in minutes, so you can focus on engaging visitors rather than wrestling with hardware.
Below is a clear, product-centered assembly guide that highlights the system’s features, offers practical setup steps, and explains how to get the best performance from your WaveLine banner at every event.
Preparing Your Workspace
First, choose a flat, clean area large enough to spread out the frame components and the printed fabric. Next, remove the transport case contents and lay each piece in logical groups: bases, uprights, connectors, and the printed graphic. This visual layout reduces setup time and minimizes the chance of missing parts.
Also, confirm that you have all components before you begin. A quick inventory ensures you can assemble without interruption, which is especially helpful when setting up under time pressure.
Frame Assembly Basics
The WaveLine frame uses precision connectors that click into place without tools, which simplifies the process. Start by assembling the base elements, and then attach uprights and cross-members. Because each piece fits only one way, you can assemble with confidence and avoid common mistakes.
Furthermore, build from the bottom up and tighten each connection by hand until you hear a firm click. This approach guarantees a stable foundation and reduces the need for adjustments later.
Components and Specifications
The system includes a lightweight aluminum frame, tension channels, and a dye-sublimated fabric graphic. Typically, the materials offer a balance of durability and portability, while the fabric provides vibrant print quality and a smooth finish. Additionally, the transport case doubles as a protective case and shipping container for convenient storage.
Key specifications to note include frame weight, packed dimensions, and recommended graphic sizes. Knowing these specs in advance helps you plan logistics and booth layout, and it ensures compatibility with your event restrictions.
Installing the Graphics
Once the frame is assembled, install the fabric graphic by inserting the silicone edge into the frame channel. Begin at one corner and work around the perimeter, gently guiding the edge so that the fabric seats evenly. As you progress, the fabric will become taut and create a seamless, wrinkle-free surface.
If you experience resistance, stop and realign the edge before continuing. This careful method prevents damage and produces the crisp, high-impact look the product is designed to deliver.
Design Features and Material Quality
WaveLine combines a slim profile with high print fidelity to maximize visual impact while minimizing booth footprint. The aluminum frame resists corrosion and provides stability, and the fabric graphics are washable and easy to replace. Therefore, the system remains a reliable choice over many events and applications.
Moreover, the edge-to-channel tensioning yields smooth faces and seamless corners, which enhances professionalism and brand perception on the show floor.
Portability and Setup Process
The entire system is engineered for travel. Consequently, the transport case protects components and simplifies shipping. At the venue, the tool-free assembly allows a single person to set up smaller configurations, while two people can complete larger setups even faster.
Practice one full assembly at your office before the event, and then you will be able to unpack, build, and position the display with confidence and speed.
Troubleshooting Common Issues
Most assembly problems are related to alignment rather than defective parts. If frame pieces do not click, check orientation and try again. Similarly, if a graphic edge resists, inspect the edge for twists or debris and then reinsert slowly. These simple checks usually resolve the issue quickly.
Also, keep an organizer with spare silicone edges and small cleaning supplies in your kit so that you can address minor wear and keep graphics pristine between events.
Maintenance and Care
Proper care extends the life of your banner. After each event, remove the fabric carefully, fold it along the recommended fold lines, and store it in the transport case. Wipe the frame connectors with a soft cloth and inspect for wear, and then replace any worn components promptly.
Regular inspections and gentle handling maintain performance and ensure your displays continue to look professional event after event.
Time-Saving Tips
Organize components into labeled bags and stage the transport case so that items are easy to reach. Work with a partner to parallelize tasks, and rehearse the setup before your first trade show to build speed and confidence. With these practices, you will reduce setup time and improve consistency.
Conclusion
WaveLine Tension Fabric Banners are built for fast assembly, strong visual impact, and repeated use. By following the steps above and caring for components properly, you will streamline setup, minimize downtime, and present a polished brand presence at every event. Ready to see how the system fits your needs? Explore the WaveLine Tension Fabric Banners range to find the configuration that suits your trade show strategy.